Monday, July 29, 2013

Reading 3 : The New Aesthetic

R E A D I N G  3
The New Aesthetic

Below, linked is a transcript is a talk by
James Bridle entitled "Waving at the Machines".
Images are included in the reading.


To quote the about page of The New Aesthetic-


Since May 2011 I have been collecting material which points towards new ways of seeing the world, an echo of the society, technology, politics and people that co-produce them.
The New Aesthetic is not a movement, it is not a thing which can be done. It is a series of artefacts of the heterogeneous network, which recognises differences, the gaps in our overlapping but distant realities.


Reading is due August 1, Thursday.
INSTEAD of two reading response questions,
I want you to search through the Tumblr linked
and select a post on it that either interests
you visually or conceptually. Link it on
a post to your blog, and write a paragraph
as it why it interested you.

You might choose one that is relevant
to your own artistic practice currently.
Also search! Don't just swipe from
the very front page.

.

Thursday, July 25, 2013

Examples and Helpful Links (HTML)

L I N K S !

Digital Media Student Works Page (links to online embedded projects)

A Digital Cheat Sheet, HTML Basics-Language

An Online Tool to Mix 'Two' Videos Together (For Preview Sake)


Y O U T U B E _ M I X E R _ R A N D O M  E X A M P L E _ / /


HTML EXAMPLE
(Though distorted from original
limited blog view)

HTML CODE FOR THIS (Just for reference.)-


<body>
<h4>
<br />
<div style="text-align: center;">
<span style="font-family: helvetica;">Y O U T U B E _ M I X E R _ E X A M P L E _ O N E _ / /</span>
</div>
<br />
<div align="center">
<iframe allowfullscreen="allowfullscreen" frameborder="0" height="200" src="http://www.youtube.com/embed/qtAg21DDKsc?rel=0" width="200"></iframe>
<iframe allowfullscreen="allowfullscreen" frameborder="0" height="200" src="http://www.youtube.com/embed/Dcn6OmGF5Rk?rel=0" width="200"></iframe>
<br />
<iframe allowfullscreen="allowfullscreen" frameborder="0" height="200" src="http://www.youtube.com/embed/W50RNAbmy3M?rel=0" width="200"></iframe>
<iframe allowfullscreen="allowfullscreen" frameborder="0" height="200" src="http://www.youtube.com/embed/OOv-Ncs7vQk?rel=0" width="200"></iframe>
<br />
<br />
<div style="background-color: #ff3333; height: 15px; width: 300px;">
</div>
<br />
<div style="background-color: #006699; height: 15px; width: 300px;">
</div>
<br />
<iframe allowfullscreen="allowfullscreen" frameborder="0" height="200" src="http://www.youtube.com/embed/cwwJkaT2PHM?rel=0" width="200"></iframe>
<iframe allowfullscreen="allowfullscreen" frameborder="0" height="200" src="http://www.youtube.com/embed/ztYnr2MV3mY?rel=0" width="200"></iframe>
<br />
<br />
<div style="background-color: #cc0000; height: 15px; width: 300px;">
</div>
<br />
<div style="background-color: white; height: 15px; width: 300px;">
</div>
<br />
<iframe allowfullscreen="allowfullscreen" frameborder="0" height="200" src="http://www.youtube.com/embed/GlhOUyy4wbs?rel=0" width="200"></iframe>
<iframe allowfullscreen="allowfullscreen" frameborder="0" height="200" src="http://www.youtube.com/embed/VtxG_qoMFTM?rel=0" width="200"></iframe>
<br />
</div>
</h4>
</body>

<br />
<div style="text-align: center;">
<span class="Apple-style-span" style="font-size: large;">HTML EXAMPLE</span></div>
<div style="text-align: center;">
<span class="Apple-style-span" style="font-size: large;">(Though distorted from original</span></div>
<div style="text-align: center;">
<span class="Apple-style-span" style="font-size: large;">limited blog view)</span></div>
<div style="text-align: center;">
<span class="Apple-style-span" style="font-size: large;"><br /></span></div>
<div style="text-align: center;">
<span class="Apple-style-span" style="font-size: large;"><br /></span></div>
<div>
<br /></div>
<div>
<br /></div>

Project 4 : YouTube Video Mixer

[ D U E ]

ASAP

Reading questions for
Walter Benjamin or Video Art
if you have not posted those
yet. If neither are complete
before Monday, no points.

July 30, Tuesday

Project 4!

Form : Just bring the basic
Dreamweaver file you construct
the project on, so we may view
the project on the big projector.


P R O J E C T  4

"It's the Youtube Video Mixer"


"inbflat"

 You will be developing a webpage as a multichannel video/audio work inspired by the In Bb 2.0 as available online: http://www.inbflat.net 


Click on the "mixer" image for the link to INBFLAT.

Your project is to have at minimum no less than 5 videos to mix. You can duplicate the format as in the "inbflat" project, using many videos or use no less than two videos to mix.

Examples:

You are making a video remix, net art project, imagine someone coming to your webpage and randomly clicking on your videos to create a unique, live montage of videos and sound.


The project will be done on Dreamweaver, a basic HTML composition program
which is used to compose HTML code and preview its results simultaneously.

There are a wide range of possibilities and variables to consider as you develop these pieces.  You are the director!  Consider all aspects of creating this piece.

This includes:

-change the background color (THIS IS REQUIRED)
-change the title text on the page (THIS IS REQUIRED)
-The shape of your grid?
-Color or tonality of your videos in the grid (all black and white, all towards one color spectrum, light, dark, day, night?)-Camerawork
 - all hand held?  All from tripod?  All zooming?  All panning left to right or up and down?  Or some combination?
-What or who is your subject and why? 
-What is the sound or sounds either repeated or different for each video? 
-Subject matter? ALL UP TO YOU.
- the video sources will come primarily from videos you create and upload to youtube.  These are to constitute no less than 2/3rds of your project.  You may use appropriated videos from youtube but these must be used sparingly - no more that 1/3rd of your videos may be from existing youtube sources.  (these are general guidelines of course, if you use 5 videos total, at least 3 must be of your making for example).  
-techniques - you will be learning some basic html coding with this project while using Dreamweaver for basic production.

-sound – for this piece you have you may have up to 20 audio channels interacting and mixing in real time! These can be all different or repeats of the same audio/video. Choose carefully as the mix of sound is very important to this project.

We will open and view the basic Dreamweaver files
in class on the due date to see what you've done!


HELPFUL HINTS 


EXAMPLE - replace the highlighted code with the embed you cut from your chosen youtube vid:


You can paste that in your Dreamweaver file and create a
link to that video! Adjust parameters within the embed code
to change the size of the video!

Additionally!


You'll find THIS useful. Hexadecimal color shortcuts
for figuring out the whole "6 number/letter" color codings
more quickly when changing the color of text/backgrounds/etc.

Monday, July 22, 2013

Approaching Video : DVD Burning

Back again. By late-Sunday, you should be finalizing your projects for the home stretch. 

Understandable that shooting and editing video is no laughing matter beginner or advanced, the fun part (and this goes for most art) is installing the piece in its proper format. In our case, we will burn DVDs so each of your emulations are playable on it! It is straightforward and I will walk you through it below. For practitioners of digital art or aspirers, this is crucial knowledge I believe to know how to do this. If you have a clue or bluntly just know how, then more power to you! For those who want to know follow along.

WHAT YOU NEED BEFORE HAND : A DVD of course. They're everywhere. Walgreens. Best Buy. Wal-Mart. Target. No missing them. They come cheap too for sleeves of 5. DVD-R is recommended, though +R is okay too. DVD-R is write once format, which in the end is better.


On we go. The top finder menu contains in the MOVIES
folder of the user two examples we will be burning. It
is necessary for the files to be in there and you'll see why.
The finder window below is iDVD in the applications
folder. Double click iDVD to continue-


Create a new project!


You have typical options such as file name and
where to save it. Here's a thing to notice and
remember of your videos : Were they widescreen
or standard ratio? What will work best for me?
Select the proper one and CREATE-


What you'll see upon entering. We'll be putting
on media very soon. Lets double click "revolution
main" to change the title...


Peripheral things to alter, aside from the title which
is fairly important. We've changed it to "Jane Doe".


In the bottom right, you will have noticed three
options... THEMES, BUTTONS, and MEDIA.
Go from THEMES (current) to MEDIA. Now
you'll realize why we needed to put the videos
in the MOVIES folder. Click on that folder within
the iDVD interface to locate its contents. Drag in...


Now they are playable!
In fact, click on the play
button to preview the DVD.


It will look as it is in a player.


Clicking on DVDDemo_1...


Clicking on DVDDemo_2...


Up to you to decorate it, though I will not
count off for particularly uninspired designs
this time around. That one is just on your
own mental anguish if it is tacky.


Simply go here to take note of the
flow your DVD runs at. Make
sure there are no warning signs of
the sort. Now click on the BURN...


It will give you this prompt. Insert the DVD.


Now the waiting game...


Congratulations. Don't forget to also
upload to Youtube and post on the blog!


Good luck.

Approaching Video : Final Cut Pro

I am posting for you an extensive walkthrough of the barebones of what you shall need to do in order to complete your project! For now, on the shooting side on things. I did everything myself so hopefully nothing will malfunction on you (or horribly malfunction for that very same reason.)


Do not consider the below as a final word on the method to accomplishing this assignment, but as a solid guide towards achieving your goal! It is very image based to help clarify what needs to be done. Do keep in mind however that it is ultimately on you come into work hours, take notes during class, and do exploring on your own for the most specific visionary details you predict happening that only you could understand.

Now to begin-

The issue of actually RECORDING VIDEO!

UNR Art Department Media Check-out!
[E-mail me or Dillion, lab tech. We have a system now for check out.]
We have plenty of cameras, tripods, and peripheral equipment ready for checkout! First come first serve basis. Same as the knowledge center.

UNR Knowledge Center A/V Equipment Checkout
http://knowledgecenter.unr.edu/atone/gear.aspx?equiptype=Video
Check out the multimedia area of the UNR Knowledge Center F1/basement (back of the big @One lab) to check out what they have! Use this link and additional tabs for more stuff (such as audio equipment for checkout) to pinpoint what you want. Some items may require on the spot training but its something you gotta deal with. Call ahead of time to make sure it is in stock! And of course, don't bring it in late! They don't like that.

Yourself!
You must have your own device that may be used for disposal for this assignment and the next. Look around. If you feel the need to obtain your own through borrowing or purchase, that's your decision.

Now a brief run through of common methods.

SHOOTING video varies from device to device, though each on its own is very intuitive to harness control of in that aspect. If you feel overwhelmed, do not hesitate to address myself or Dillon.

Capturing media also very much varies, but we can begin here visually are it relates to editing the video. I have done two very quick graphics to explain. CLICK TO ENLARGE.


The manner of recording on each device varies
from data on the actual device drive, a memory
card, a cassette, or otherwise. Important to know
what you're dealing with there. Often a breeze.


Find this application if you're importing most
material. Oftentimes you'll have to (per image
caption) with a video camera go through LOG
AND TRANSFER/CAPTURE from the FILE
menu on Final Cut Pro to get off card/cassette.
For a typical iDevice or [video] SLR camera- this.


 You'll typically find a screen like this. Select
your device and select the .MOV (or movie file)
you want to import from your device into a
certain folder. In this image, I am importing
that video we shot in class of myself impersonating
Vito Acconci from my iPhone 4S onto the Desktop.


Viola. A brand new video file. Get
ready to import it into Final Cut Pro for use.
More if you have multiple shots.


A master runthrough of the FCP interface.
Beyond this explanation, it should be easier
to intuitively figure out the tools involved.


Start off by importing that video file into FCP!
FILE -> Import -> Files. Sometimes FOLDER
if you have just a ton of files. For now FILES.


We're in the system now. Our file is
in the BROWSER. It can be dragged
down onto the timeline for editing.


Drag and drop. That simple. Top bars above the
equator line are VIDEO and the bottom is VIDEO.
Note how we're looking at Vito/me on the viewer
and canvas. I have the file selected from the browser
and am viewing that on the viewer. However, the
video is on the timeline and the scrubber is over
a part of it so we are viewing it. The reason the base
file is upside down is because I may have shot it
upside down. I fixed it through a tool called "rotate"
within the viewer menu. If you shoot properly like
I didn't, that shouldn't be necessary to do.


What you'll do now (and everytime there
is RED on the video or audio) is SEQUENCE ->
Render Selection -> Both. This is so you
can play video back and actually see what
you are doing.


One problem though : Our video may look nothing
like Vito Acconci effect wise, even though I'm
slouched down and slurring at the camera like him.
Lets browse EFFECTS. It is up to you ultimately
to decipher which of the effects that will benefit you.
Once you have added an effect, it can be modified
through the viewer on its own tab.


This one's a freebee. Look at the image to find
out where Desaturate is. Some of you may be utilizing
this as lots of the UBU videos are black and white.
The reason why both the viewer and canvas are B&W
is that I have double clicked on the video WHILE it is
on the timeline, so now the 'viewer' is looking at that
instead of the video file from the browser (the raw file).


Now its a process of adding more effects. Look
at the viewer side and see how you can modify
effects. It's literally like Photoshop, just as a
video editing exercise. Again, decipher what
effects you'll need for your OWN videos.


Lets look at little more closely at the TOOLBAR.
Say I wanna hack off that unrendered end of my
video because I started too late, rushed the project,
and generally don't care. Look below...


1. Select the blade tool.
Cut on the timeline to
divide video and/or audio!
Tip : Align scrubber to where
you wanna cut for a fine cut.

2. Select move tool again.
Just to see its separate.

3. Have cut off end selected and
then DELETE or COMMAND+X
to get rid of it. Now its gone!


If you're interested in special transitions
between clips and at the ends of clips,
use this! For instance, you can find "CROSS
DISSOLVE" and fade into/from black.


KEYS : I and O are key. When ready to export video,
hit I when scrubber is at beginning of your video to
have an "IN" point. O likewise at the end, as an "OUT" point.
Make sure you're on the timeline when you do this.


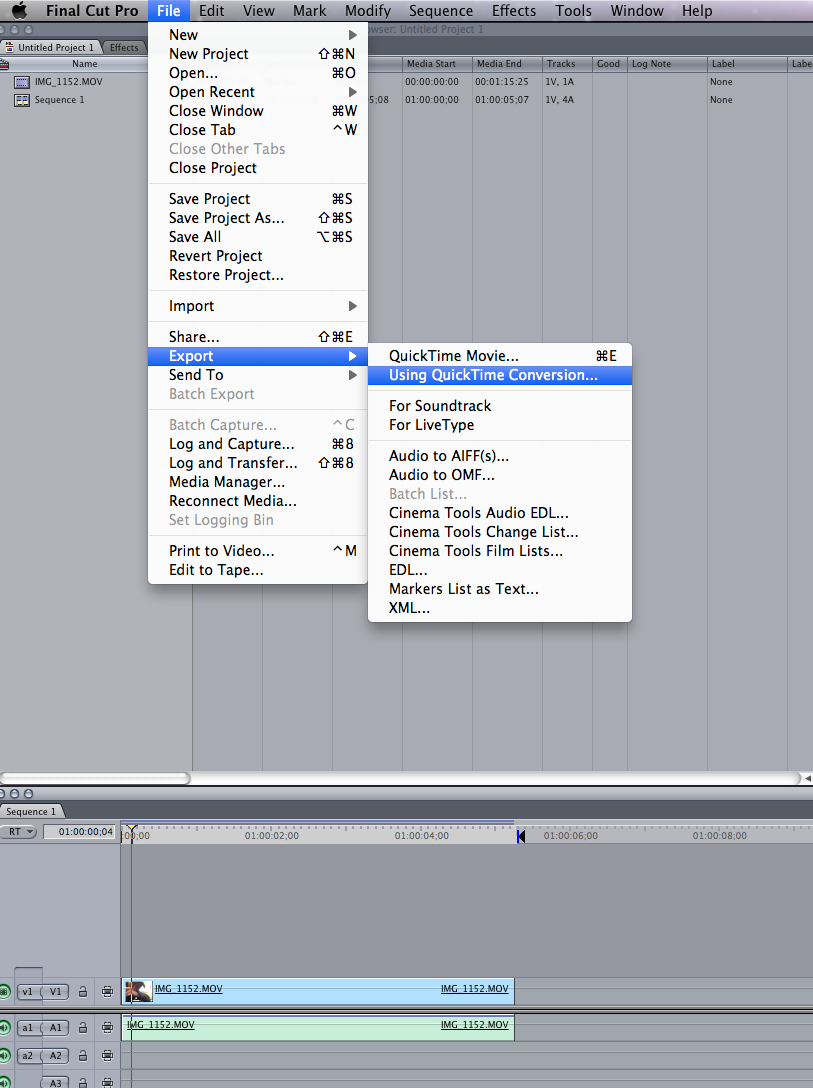
FILE -> EXPORT ->
Using Quicktime Conversion


You should get an interface like this.
Don't SAVE (export) quite yet. You need
to go to OPTIONS besides QT Movie.


You'll get to this now. The next three images
will be selecting these in THIS order-
Video : Settings.
Video : Size.
Audio : Settings.


The only things you should change on this
is scrub Quality to BEST.


Video : Size. It varies. We clearly have standard ratio
[4:3] here so export on the left dimensions. If you
have a high quality widescreen, export w/ right settings.


Audio : Best. NOW GO BACK TO
THE FILE SAVE SCREEN AND "SAVE".
That means export. It will export your video!
This may/may not take some time. Depending
on your length.


Congratulations. You have a new video file.