Blender 3D : A Direct Primer, Benjamin Poynter
1.) Navigation.
-Middle Mouse Wheel to Zoom In/Out.
-Shift + Middle Mouse Press to Strafe.
-Alt + Left Mouse Press to rotate around.
-(If number pad available, 8-4-2-6 to adjust view intricately.)
-CONTROL + Z to undo.
-Left Mouse Press to position center of world rotation.
2.) Modes.
-[Find a toolbar widget with a drop down "Object Mode" menu.]
-OBJECT mode. Where you can just move around solid meshes. For example, a cube.
-EDIT mode. Where you can actually extrude/morph/edit meshes. We can 'change' a cube.
-To note, in either mode, next to "Object Mode" menu, you can toggle wireframe/solid views.
-TAB switches from OBJECT to EDIT easily as well.
3.) Selecting.
-[a] to select/deselect all objects.
-In OBJECT mode, Right Mouse Press object to select it.
-To select multiple objects, or deselect one, hit Shift + Right Mouse Press.
-In OBJECT mode, you can shift-select multiple objects. In EDIT mode, its a different story.
-To delete, have selected and press [x]. In EDIT mode, you can delete specific details.
-To duplicate selected object, Shift + [d]. Move newly duplicated object.
-Lasso selection, if desired : Hold down CONTROL and Left Mouse Press. Drag around.
4.) The Gizmo & Moving Objects.
-The gizmo is the red-blue-green icon you use to morph object. Appears when object is selected.
-XYZ coordinates. Think of X and Y as flat. (X, west/east ; Y, north/south). Z is sky/ground.
-[Near the "Object Mode" drop down on its respective toolbar is a SMALL red-blue-green icon.]
-Arrow Icon : Move selected object directly along the rails of XYZ coordinates. Click & drag.
-Curve Icon : Rotate selected object in its center. Click & drag the now different gizmo.
-FAQ! To re-center rotate/pivot on object, reposition object in edit mode! Pivot remains still.
-Line+Square Icon : Rescale select object along XYZ coordinates.
5.) Editing the Mesh. <Needs to be done in EDIT MODE.>
-Vertex = point two edges cross. Edge = point two faces cross. Face = Open space/polygon.
-On same bar as Modes and XYZ commands, find Vertex-Edge-Face icon selections.
-You can (right click) select them. Click and move, rotate, and scale them. Experiment!
-Multiple selection rules with Shift + Right Mouse Press apply here as well. [a] to deselect.
-Important : Subdivide = CONTROL + [r]. Cut a Face in place to create more vertexes/edges.
-While you have a neon "subdivide line" previewing your cut, scroll Middle Mouse Wheel to
create more edges in your cut. Left Mouse Press to cut. You can move cut. [a] to end sequence.
-Extrude tool is the [e] key. Extends/duplicates selected vertex/edge/face.
6.) Rendering an Image Output.
-First, you want to light your photo well. By File.. Add -> Lamp -> Choose Type. Experiment!
-Note CAMERA placement. View -> Camera to see what camera sees. View -> Align -> Align Camera View to Ours. To make 'our' view cam's. Adjust camera externally with gizmo if need.
-Pro tip for scene views : View on toolbar -> Selections (Top, Left, 'Camera', Etc.).
-Get an image photo-file! At top by file : Render -> Render Image. Or F12.
-You'll get preview. Default size : 960x540. F3 to save file of image. Or Image -> Save As.
These are the complete barebones of Blender 3D. All you'll need to get started!
.
F R E Q U E N T L Y
A S K E D
Q U E S T I O N S
( b l e n d e r )
This will be an ongoing post. I will attempt to physically address each issue as they come up or in timely fashion. Via email or otherwise.
1.) ((How to rotate view of world/objects, if I can't from primer instructions.))
(Two images for reference!)
Version 2.5 (-) . Drag down the top line between main 'Blender' title bar and 'File' bar. It should expose a large menu. In the middle of it, click "Emulate 3 Button Mouse" to where it is on.
Version 2.5 (+) . File -> User Preferences. INPUT option on bar. On left, scroll and click "Emulate 3 Button Mouse" to where it is on.


2.) ((Create object in space to edit other than a cube?))
Top Left bar; Add -> Mesh -> choose (Cube, Sphere, Cylinder, and Many More)
3.) ((How may I combine objects in space?))
Select both and hit (Ctrl + J). Should be prompted to combine. Hit okay.
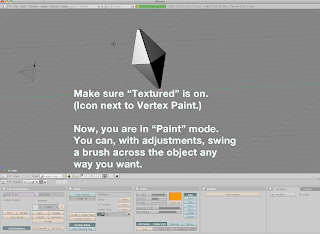
4.) ((Apply color/texture to object?))
2.5 (-) (Should be applicable to 2.5+ as well.) . Follow these steps.


To be continued.
.
1.) ((How to rotate view of world/objects, if I can't from primer instructions.))
(Two images for reference!)
Version 2.5 (-) . Drag down the top line between main 'Blender' title bar and 'File' bar. It should expose a large menu. In the middle of it, click "Emulate 3 Button Mouse" to where it is on.
Version 2.5 (+) . File -> User Preferences. INPUT option on bar. On left, scroll and click "Emulate 3 Button Mouse" to where it is on.


2.) ((Create object in space to edit other than a cube?))
Top Left bar; Add -> Mesh -> choose (Cube, Sphere, Cylinder, and Many More)
3.) ((How may I combine objects in space?))
Select both and hit (Ctrl + J). Should be prompted to combine. Hit okay.
4.) ((Apply color/texture to object?))
2.5 (-) (Should be applicable to 2.5+ as well.) . Follow these steps.


5.) ((A useful brush-coloring tool (Color multiple polygons of object?))
2.5 (-) (Should be applicable to 2.5+ as well.) . Follow these steps.


To be continued.
.
No comments:
Post a Comment